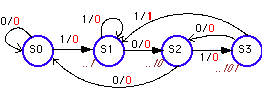
Figure 1: A Mealy machine for a non-resetting sequence detector for the input sequence 1011.
Finite state machines can be specified in a variety of ways. One way is to use HDL, such as ABEL or VHDL. The ABEL tutorial explains how the STATE_DIAGRAM, IF-THEN-ELSE or the TRUTH_TABLE construct in ABEL can be used to fine state machines. Examples of both a Mealy and a Moore machine have been discussed. The Xilinx Foundation tools provide an alternative method to specify a state machine. In order to use the State Editor, one must have XABEL or X-VHDL installed. The State Editor allows you to define a state diagram using a graphical description and to convert the graphical description in either ABEL or VHDL.
In order to show the use of the State Editor, we will implement the same sequence detector that we used to illustrate the use of ABEL to define a state machine. We will implement two variations of the same sequence detector - one implemented as a Mealy machine and another as a Moore machine.
The sequence detector recognizes the following input bit sequence X: "1011". The machine will keep checking for the proper bit sequence and does not reset to the initial state after it has recognized the string. In case we are implementing a Mealy machine, the output is associated with the transitions as indicated on the following state diagram.

Figure 1: A Mealy machine for a non-resetting sequence detector for the input sequence 1011.
In the following sections we will explain how to define the above state diagram using the State Editor. First one has to create a new project (or use an existing project). For help with the State Editor go to HELP -> FOUNDATION HELP CONTENTS -> STATE EDITOR.
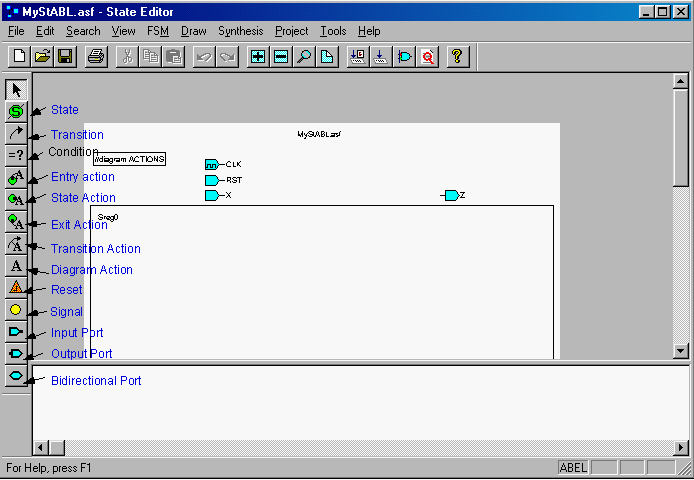
Figure 2: State Editor window used to define the state diagram (Screen clip from XilinxXACTstep(TM) Foundation software)
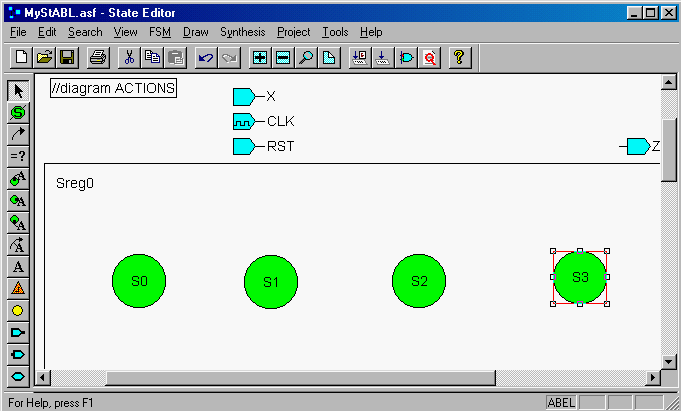
Figure 3: The four states of the sequence detector. (Screen clip from XilinxXACTstep(TM) Foundation software)
The next step is to define the conditions associated with each
transition (arrow).
Figure 4 shows the state diagram with labeled transitions. You can select the conditions and move them around on the diagram.
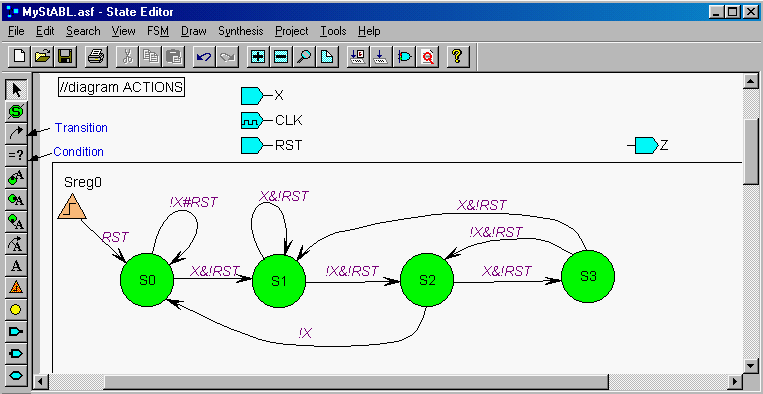
Figure 4: State diagram of the sequence detector with transitions and
conditions using the ABEL syntax.
(Screen clip from XilinxXACTstep(TM)
Foundation software)
Actions (i.e. output signals) are either associated with transitions as is
the case for a Mealy machine, or with a state as is the case for a Moore
machine. In the example of our sequence detector (Mealy machine) we
will associate actions with a transition.
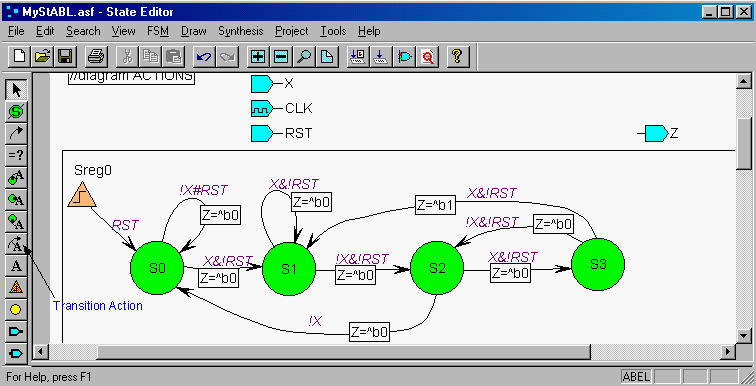
Figure 5a: Completed State Diagram of the sequence detector implemented as a
Mealy machine using ABEL.
(Screen clip from XilinxXACTstep(TM) Foundation
software)
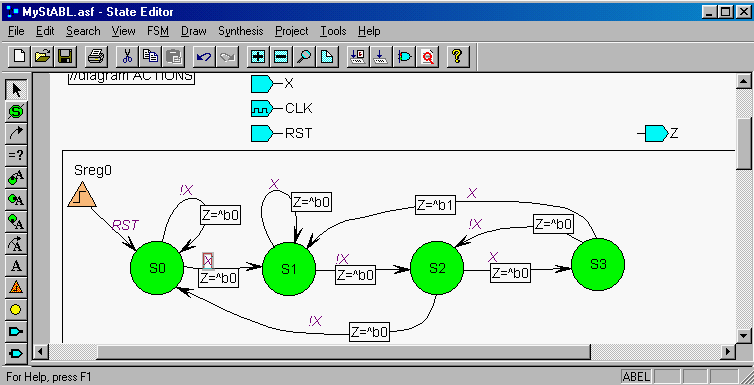
Figure 5b: State Diagram of the (1011) sequence detector implemented as a
Mealy machine using ABEL. The signal X is the input string.
(Screen clip
from Xilinx (TM) Foundation software).
The same sequence detector can also be created using VHDL instead of ABEL. The state diagram of the (1011) sequence detector implemented as a Mealy machine with VHDL is shown in Figure 5c below.
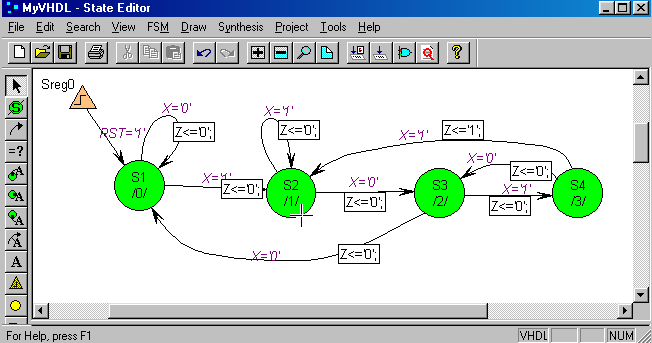
Figure 5c: State Diagram of the (1011) sequence detector implemented as a
Mealy machine with VHDL.
(Screen clip from XilinxXACTstep(TM) Foundation
software)
An example of a Moore
machine that implements the same sequence detector is given further on.
Once you have created a macro or synthesized the state diagram you can
do a simulation. The functional simulation of the Mealy machine of the
sequence detector is shown in Figure 6. The output
is valid at the end of the state-time which occurs just before the rising edge
of the clock. The output is asserted after the sequence …1011. Notice that the
output shows some glitches as is typical for an asynchronous Mealy machine.
For a more detailed discussion of the output of the Mealy machine click
here.
.
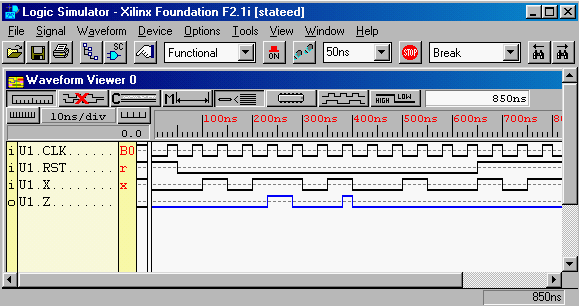
Figure 6: Functional simulation of the Mealy sequence detector (sequence
…1011).
(Screen clip from XilinxXACTstep(TM) Foundation software)
Graphical Simulation
When you use for the
encoding "Encoded (e.g. binary) " instead of Symbolic encoding you can follow
the state transitions on the State Diagram during simulation. This is a good
feature when debugging your state diagram. Start the simulator and define the
signals. Next, open the state diagram; this can be done by using the Push
Hierarchy button in the schematic editor. Once the State Editor window is
open, go to TOOLS -> SIMULATION. This will activate the graphical
simulation feature. The best is to have both the Waveform viewer and the State
Editor window open so you can follow the state of simulation. The graphical
simulation feature does not work for Mealy machines. An example
is given below for a Moore Machine sequence detector.
When the circuit works properly you can implement it. Go to the Project
Manager and click on the Implementation Icon. For more information about
implementation consult the tutorial section in implementation.
If one wants to eliminate the glitches in the output in the Mealy machine, one can implement the sequence detector as a Moore machine. The state diagram is given in Figure 7 below. One has to add one state, S4, as compared to the Mealy machine.

Figure 7: State diagram of a sequence detector for the sequence 1011, implemented as a Moore machine.
The corresponding state diagram description using the State Editor is given in Figure 8. The difference with the one of the Mealy machine, is that Actions are now associated with a State. These can be defined by clicking on Action State icon on the left vertical toolbar in the State Editor window (or by selecting FSM -> ACTIONS ->STATE).
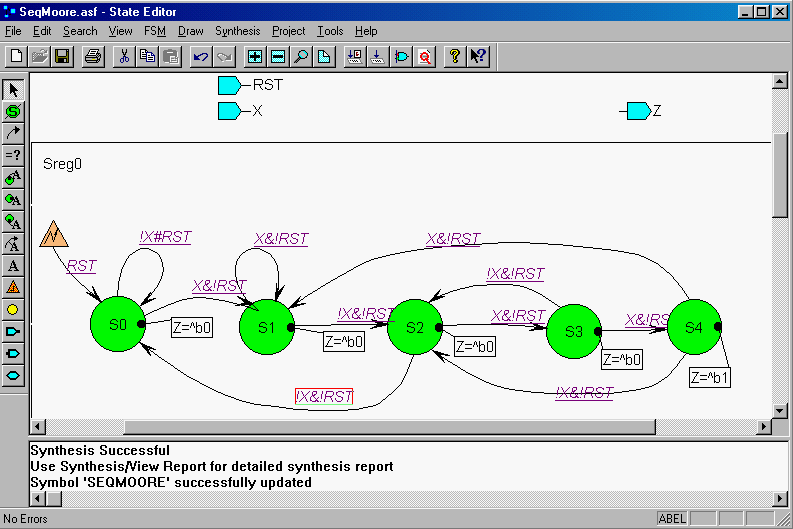
Figure 8: Completed State Diagram of the sequence detector implemented as a Moore machine using ABEL (Screen clip from XilinxXACTstep(TM) Foundation software)
In order to do a graphical simulation we will use Binary state encoding instead of symbolic encoding. Select FSM -> MACHINE ->Sreg0. In the Machine Properties window select Encode: binary. Click OK. To see the ABEL code, select SYNTHESIS -> HDL CODE GENERATION. To see the ABEL code click here.
We will do a functional simulation together with the graphical simulation of the State Machine. Start the simulator from the Project Manager window and select the signals and define the stimulators. Next, open the State Diagram by using the Push Hierarchy (H) button in the Schematic Editor window. From the State Diagram window, select TOOLS -> SIMULATION. The functional simulation of the Moore machine together with the state diagram is shown in Figure 9. The output goes high after the sequence 1011. No glitches are present in the output as compared to the Mealy machine (see Figure 6). Notice that the graphical editor can only be used when the State Editor is opened from the Project Manager or by using the Push Hierarchy in the schematic.
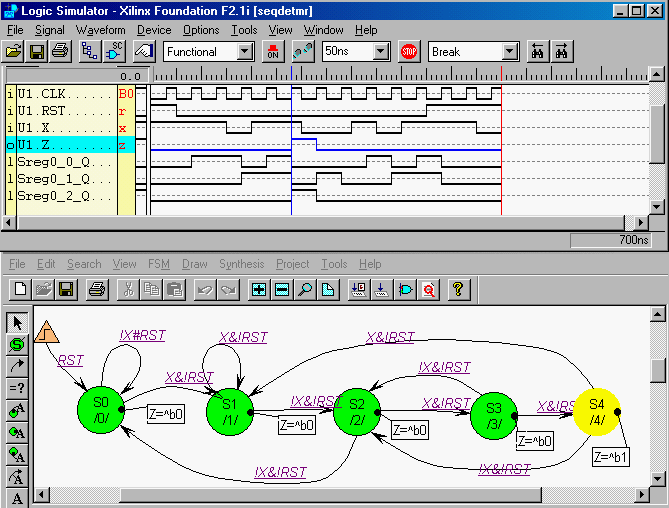
Figure 9: Functional simulation of the Moore Sequence detector (1011). The
top window shows the functional simulation
and the bottom one, the state
diagram. The State S4 is highlighted after the sequence (1011).
(Screen clip
from XilinxXACTstep(TM) Foundation software)
In the above example we created a Finite State Machine macro as part of a top-level schematic. However, a schematic project can have a top-level ABEL design created with the FSM editor (top-level ABEL designs are not recommended for FPGA projects). To add a top-level ABEL design to the project, do the following: in the State Editor, select FILE - SAVE; then select PROJECT -> ADD to PROJECT. Next, select SYNTHESIS -> SYNTHESIZE.
For more information about the State Editor, go to HELP -> STATE EDITOR HELP CONTENT in the State Editor Window.
Copyright 1998, Jan Van der
Spiegel <jan@ee.upenn.edu>; Created November 15, 1998; Updated May 17,
2000.